Saturday, February 26, 2011

Spicy Tuna Tartare with Avocado

Now that I have some time to relax, I wanted to treat myself with a nice piece of sushi grade tuna steak.  I finally dragged myself to H-Mart, and purchased a 6 oz. tuna steak for about $6. Tuna...absolutely beautiful.


Spicy Tuna Tartare with Avocado topped with Masago

Tuna and avocado. I don't know what it is, but for some reason they just taste perfect together, especially in sushi. As I was pondering over different dishes I could make using tuna and avocado (other than sushi or seared tuna steak), I was doing my little at-home workout while watching Barefoot Contessa. Coincidently, she just happened to be making tuna tartare. Perfecttt! That's exactly what I was craving...so here's my take on her recipe because I wanted to cut down the oil and increase the heat. AND of course I need my sriracha and cilantro for extra flavor. They make everything taste better, IMO. =)

FYI, tuna tartare is very easy to assemble and tastes fresh & creamy from the avocado and cilantro. The saltiness from the crunchy masago on top also pairs wonderfully with the tuna. Give it a try! You should definitely try to make your own tuna tartare (or sashimi/sushi) by buying your own sushi grade tuna.  It's so worth it, especially because restaurants charge an arm and a leg for one piece of sashimi...


6 oz. tuna steak from H-Mart ($6)

Tuna, scallions, cilantro, cucumber, and lime zest

Gently mix in 1/2 an avocado, diced
 

Spicy Tuna Tartare:
 Serving Size = Approx. 15-20

Ingredients:
6 oz. sushi grade tuna steak
1 tbs cucumber, finely chopped
1 avocado
1 lime, juice & zest
1 tbs grapeseed oil (or olive oil)
1 tsp soy sauce
1 tsp rice vinegar
1/2 tsp wasabi paste
1 tsp sriracha
2 tbs scallions
1 tbs cilantro
1 tsp sesame seeds, toasted
Dash of salt & pepper to taste

Capelin Roe (Masago) for garnish


1) Dice tuna steak into about 1/4 inch cubes and place in medium sized bowl. Toss in finely chopped cucumbers, scallions, cilantro, and lime zest. Mix in wasabi paste and sriracha
2) In a small bowl, mix together oil, soy sauce, rice vinegar, and lime juice. Pour into tuna and mix
3) Dice avocado into 1/4 inch cubes and gently mix into tuna. Add toasted sesame seeds on top.
4) Serve chilled for tartare to thicken and soak up the dressing (about 1 hour). Serve in cucumber cups, with crackers/bread, or in spoons. Garnish with masago


Served in spoons & shot glasses

Wednesday, February 16, 2011

Whole Wheat Waffles w/ Blueberry Sauce

Pretty nice day to eat on my balcony =)

Since I usually eat savory breakfast/brunch food, I decided to make something more on the sweeter side.  I couldn't decide if I wanted to make pancakes or waffles, but since I found this old and lonely waffle iron sitting in the back of my kitchen cabinet, I went for the waffles.

I made some nutritious WWWs (whole wheat waffles) using WW flour, oatmeal, wheat bran, and unsweetened apple sauce. I sandwiched the waffles with mashed bananas & chopped walnuts in the middle and topped them with some thick blueberry sauce and a dollop of Greek yogurt. I didn't add any sugar to my batter because the sugars from the banana and the blueberries would do the trick.

I actually REALLY enjoyed this brunch because you get a piece of the whole grain waffle, creamy banana with a slight walnut crunch, tangy yogurt, and sweet blueberry sauce all in one bite! Awesomeness! =)


I'm a huge fan of WW flour, but I know some people aren't so fond of it because it is more dense than AP flour and definitely has a distinct taste and texture. If you can't handle WW flour, you could always replace it with AP flour in this recipe...you'll just miss out on the additional nutrition! =(

OK, so let's start with the waffles:


Beat egg whites into soft peaks

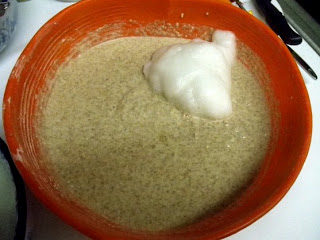
Fold in egg whites with a spatula, 1 scoop at a time

Cut in half, spread banana & walnuts, and sandwich with other half

Whole Wheat Waffles:
 Serving Size = Approx. 5

Dry Ingredients:
1 cup whole wheat flour
1/2 cup oatmeal, finely ground
1/4 cup wheat bran
1/4 cup all-purpose flour
4 tsp baking powder
1/4 tsp cinnamon
1/2 nutmeg 
1/4 tsp salt
Wet Ingredients:  
2 eggs, separated
1 3/4 cup almond milk 
1/2 cup applesauce
1 tsp vanilla 


1) Plug in waffle iron
2) Mix dry ingredients into a medium bowl
3) Separate room temperature eggs. Set aside eggwhites and beat yolks in medium bowl. Mix in rest of wet ingredients to egg yolks
4) Slowly mix in dry ingredients into wet mixture.  In separate bowl with eggwhites, beat them into small peaks. I usually start at a low mixing speed until it get's a little foamy, and then I slowly increase the speed until soft peaks form
5) With spatula, scoop out eggwhites, 1/3 at a time, and gently fold into batter.
6) Spray waffle iron with nonstick spray if needed, and pour in batter as specified by your specific waffle iron. (My iron used about 1 cup of batter).
7) After done cooking, place on cooling rack and serve
8) Leftovers: Place in air tight container of freezer bag. Stick in toaster before eating!


Frozen blueberries, water, freshly squeezed orange juice


Blueberry Sauce (low-sugar):

Ingredients:
1 cup blueberries, frozen or fresh
3 tbs water
1/4 cup fresh orange juice (about 1 orange) 
1 1/2 tsp orange JELLO mix*
1/8 tsp cinnamon 
3 tsp almond milk**
1 tsp orange zest
* Alternative: Cornstarch. Just make sure you mix cornstarch in a little water before stirring it into hot sauce
** Add more mik or water to thin out sauce to your liking


1) Place blueberries, water, and orange juice in pot and bring to boil
2) Reduce to simmer and cook for about 5-7 minutes
3) Add JELLO mix, cinnamon, and milk. Simmer for 1 more minute 
4) Pour into bowl and let cool to allow sauce to thicken up
5) Storage: Store in airtight container and refrigerate. If it becomes too thick, dilute with milk or water, or microwave it for 15-20 seconds
* I didn't realize this until I put it in, but JELLO contains aspartame, which is a sugar alternative to add sweetness. I'm not a huge fan of this sugar replacement method, but I'll be OK! =P


Cut sandwich in half, stack, top with sauce and yogurt, and garnish!
Take a nice big bite!
Yummy mess

Sunday, February 13, 2011

Almond Butter Chicken Rotini


Almond Butter Chicken Rotini (whole grain)

I just bought a 26 oz. jar of MaraNatha roasted almond butter from Costco for about $6!  This is so much cheaper than Whole Foods and Amazon. It's super thick and creamy with an earthy almond aftertaste, and it goes perfectly with my banana and toast. 

Today, I felt like using almond butter in my pasta sauce to add a slight nutty flavor and creamy texture to my dish. Since the butter already contains oil from the almonds, I didn't add any olive oil and sesame oil like I usually do.  I also mixed in some almond milk to help loosen up the thickness of the almond butter.  As you can see, it's my quick-fix almond-lover's recipe. Yum! =)

Almond Butter (Costco $5.85), Almond Milk (Whole Foods- $3.39)

Almond Butter Chicken Rotini
 Serving Size = 2-3

Ingredients:
1 cooked chicken breast (salt & peppered)
2 cups whole grain or whole wheat pasta, raw
1 tbs almond butter
2 tsp almond milk
1 tsp soy sauce, light sodium
1 tsp rice vinegar
pinch of ginger
1 tsp sriracha (to taste)
1 tsp sesame seeds, toasted
1 tbs cilantro (extra for garnish)
1 tbs scallions
1 tbs sliced almonds

1) Cook pasta and chicken, and toast sesame seeds over medium heat for a few minutes. Set aside.
2) In a small bowl, mix in almond butter, almond milk, soy sauce, rice vinegar, a pinch of ginger, and sriracha.
3) Cut chicken into cubes and toss in sesame seeds. Add pasta, almond butter sauce, cilantro, and scallions. Garnish with cilantro and sliced almonds.
4) Serve with more sriracha sauce on top, of course
* You can double the sauce recipe if you like it more saucy and add another chicken breast. 


-----------------------------------------------------------------------------------------------

Nutrition Facts: MaraNatha Almond Butter

Serving Size= 1 tbs

Calories: 90
Fat: 8g
Saturated Fat: 0.5g
Sodium: 0
Carbohydrate: 3g
Dietary Fiber: 2g
Sugar: 1g
Protein: 3g

-----------------------------------------------------------------------------------------------

Tuesday, February 8, 2011

Garlic Naan


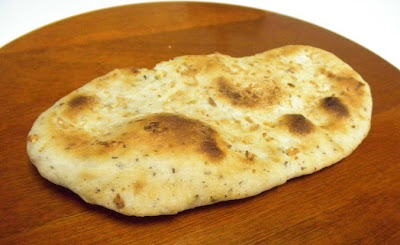
Naan--the little specs are from the flaxseed mix (egg replacement)

How does naan have the perfect amount of crisp yet be so light, fluffy, and chewy inside? Without a doubt, naan is my favorite bread...and topped with garlic?? You gotta love it. If you've never had naan before, shame on you!

Naan is a leavened Indian flatbread that is much more special in its taste, texture, and making compared to your average bread. Since I've never attempted to make naan before, I found this recipe that seemed fairly simple without the fancy equipment.  It came out wonderfully! The main thing I would try to improve upon next time is to get a little more browning on top without making it too crispy and hard on the edges.

I finally had the chance to make naan today, and as I was in the process of putting all the ingredients together, I had no egg!!! After getting over my initial panic, I remembered my sister telling me an egg replacement method (1 tbs ground flaxseed + 3 tbs water). Then I realized it was on the recipe too, so I was a happy girl again. I wonder how much of a difference the egg would've made, so I definitely need to try this and other recipes again. Keep a look out! I'll let you all know which one is the best! This one was definitely a success, though! I'll also try it with a REAL egg next time.


Here are my tips as a naan-making newbie:
  • Be aware that 550F is HOT, so the steam coming out made my alarms go off right when I opened the oven...heh
  • Roll it out evenly and not too thick. Otherwise, it'll taste like a regular piece of thick bread
  • Use baking stone if you have one. Apparently it makes a world of a difference because it absorbs more moisture, can stand high temperatures, and gives a nice and balanced crust at the bottom than a regular baking sheet. I used a cookie sheet and it warped in the oven, but it eventually turned normal after leaving it in the oven while the oven was cooling off...no big
  • It took me a few tries but you've got to adjust to your oven! I think I'll try to cook it on a hot pan next time and perhaps finish it off in the broiler to compare it with my baking results.


P.S. Can someone buy me a tandoor for a late birthday present? I think I need one. =)


Form into ball, drizzle with oil, and let sit for 1hr 15 min in warm oven to rise

Doubled in volume

Roll out and top with garlic, toss is hand-to-hand, and pop in oven


Garlic Naan:
 Serving Size = 6

Ingredients:
2 cups all-purpose flour
1/2 cup lukewarm water
1 tsp dry active yeast
1 tsp sugar
1 tsp salt
4 tsp oil
2 tbs plain yogurt (I used Greek)
1 tbs ground flaxseed + 3 tbs water (Egg replacement)

1) Preheat oven to 170F just to warm the oven for some yeast action.
2) Microwave 1/2 cup water for 15 seconds. Mix in yeast and sugar. Cover and let sit for about 7 minutes
3) Medium bowl: Add flour, add salt, and slowly mix in oil. 
4) After yeast is risen and ready, add yogurt. Mix together flaxseed + 3 tbs water, and add into yeast water. I had no eggs, but use an egg if you like!
5) Turn off oven. Mix wet into dry ingredients and knead for a few minutes as needed. Bring to a ball, drizzle dough with a few drops of oil, cover, and pop into warm oven for about 1.25 to 1.5 hours.
6) After dough as doubled in size, increase oven to 550F and move oven rack to the highest level. Place a baking sheet (or baking stone if you have one)
7) Knead soft dough again and form 5-6 balls. Flour surface and rolling pin. Roll dough into an oval shape until it's approx. 1/4 inch thick. Make sure the dough is evenly rolled. Top with finely minced garlic and roll it into the dough.
8) Lightly toss dough from hand-to-hand, then place dough in oven for about 3-4 minutes or until lightly browned. Brush with butter if you must. Serve it hot!
* I also tried popping it in my little mini oven broiler to brown it for the last minute or so. Try both methods out!


---------------------------------------------------
Nutrition Facts: Garlic Naan


         Not important!...=)

----------------------------------------------------

Wednesday, February 2, 2011

Baked Cinnamon Banana Chips

Here's an alternative to those fried banana chips:

Baked Cinnamon Banana Chips

Since I eat a frozen banana everyday, I wanted to try something different. If you know my eating habits, I do my best to eat healthy, but baked chips and crackers are my absolute weakness, especially Wheat Thins and Triscuits. The sad part is that my friends would even get me Wheat Thins for my birthday!  I know they're not the healthiest snacks, but sometimes I can't overcome my urge for some crunchy carbs. Therefore, I wanted to try baking some banana chips to have the best of both worlds without the guilt.

Banana chips are usually fried and contain preservatives that enable them to retain their yellow color.  Although these don't taste exactly like the fried once (of course), this is definitely a healthier alternative. Since these are baked, the natural sugars from the banana lightly browned and caramelized in the oven. The added kick of cinnamon also complements the caramelized sugar.

Tip: This recipe is very simple, but don't be like me and forget about them in the oven! I went to my room to study and left them in the oven for probably 5 minutes longer than I wanted to. Keep an eye on them! Good thing I saved them before they got burnt.


Banana, lemon juice, and cinnamon


Cooling for a few minutes

Baked Banana Chips:
 Serving Size = 1

Ingredients:
1 ripe banana
1/8 tsp cinnamon
1 tsp fresh lemon juice

1) Preheat oven to 200F. Spray some non-stick spray or place parchment paper on cookie sheet
2) Peel banana and slice thinly at a diagonal angle. Width = Approx 1.4 inch
3) Squeeze fresh lemon juice into a medium bowl and stir in cinnamon
4) Gently place banana slices into bowl and evenly coat the slices. Be very gentle to avoid breakage
5) Place slices on cookie sheet and bake. Bake for about 2 hours flipping every 30 minutes. Keep your eye on them though to make sure they don't burn because some ovens will make you take them out earlier. Chips won't be crispy right out of the oven, so cool on rack for 5 minutes to get crispy.


Banana chips + my favorite nuts


---------------------------------------------------
Nutrition Facts: Banana

Serving Size= 1 large banana, raw

Calories: 121
Fat: 0g
Carbohydrate: 31g
Dietary Fiber: 4g
Sugar: 17g (all natural!)
Protein: 1

Vitamin B6:  .5mg (25%)
Vitamin C 11.8mg (20%)
Potassium:
487mg (14%)
Manganese: .4mg (14%)
----------------------------------------------------